Five Ways to Free Up Space on Your Android Device
Android phones and tablets can fill up quickly as you download apps, add media files like music and movies, and cache data for use offline. Many lower-end devices may only include a few gigabytes of storage, making this even more of a problem.
The less space you have, the more time you’ll have to spend micromanaging the internal storage. If you find yourself regularly running out of space and needing to manage it, consider getting a phone or tablet with more storage next time around.
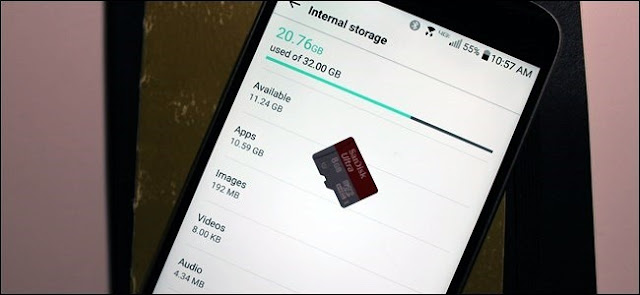
Use Android’s Built-in Storage Tool
Modern versions of Android have a Storage pane that will show you exactly what is taking up storage on your device. To find this, open the Settings screen and tap Storage. You can see how much space is used up by apps and their data, by pictures and videos, audio files, downloads, cached data, and miscellaneous other files. The thing is, it works a little bit differently depending on which version of Android you’re using.
Android 8.0 Oreo
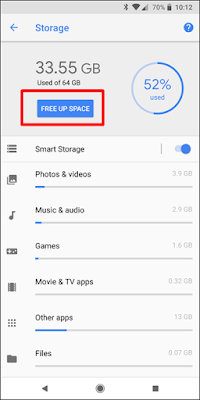
Google took a fundamentally different approach with Oreo than previous versions of Android by breaking down the Storage menu into a more granular list.
Where the list was grouped together by apps and then varying types of files in Nougat and lower (which we’ll talk about down below), Oreo does things a little differently by groups and files together by category. For example, when you open the “Photos & Videos” option, it doesn’t just show you which pictures and videos are taking up space on your phone, but any associated apps, as well—like photo or video editors.
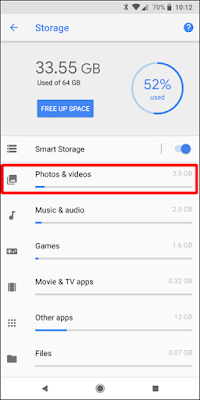
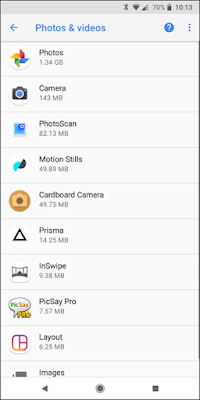
Not all apps will fall into the predefined categories, so there’s a sort of overflow for everything else, called “Other apps.” Similarly, there’s a “Files” option that lists any file that doesn’t fall into another category.
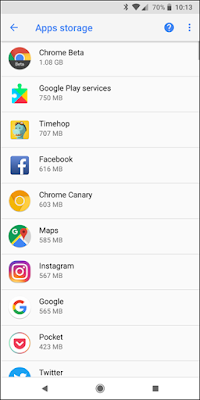
Now, all that said, there’s actually an absurdly easy way to free up space in Oreo without having to dig through every menu entry: the big “Free Up Space” button at the top. Tap it.
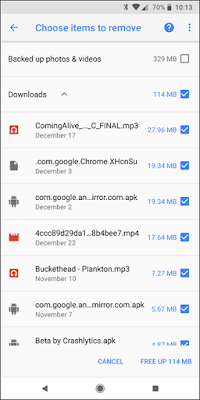
Doing this will basically bring up a list of Downloads on your device, as well as any photos and videos that have already been backed up (this is a simple check option, not a full list), and any “Infrequently used apps” if applicable. Choose what you want to delete, and poof—free space in the house.
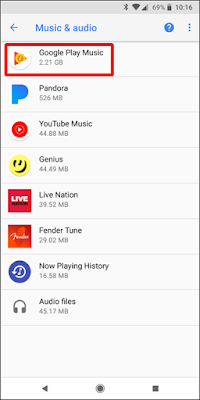
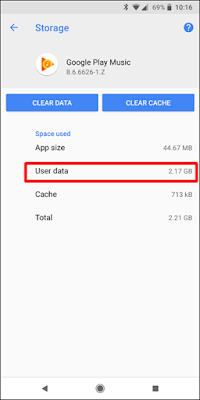
If that doesn’t clear up enough for you, however, then it’s time to dig through each option manually. Pay close attention to apps and how much data they’re storing—for example, apps like Google Play Music (or other music streaming apps) can store quite a bit of data as they stream. Clear that out to save yourself a ton of space.
Android 7.0 Nougat and Below
Once you’re in the Storage menu in any version of Android below Oreo, just tap an option to see exactly what’s using up space and delete it. For example, you could tap Apps to see a list of apps using up the most space and remove them. Tap downloads to view your downloads list where you can remove files and tap cached data to clear the data of all installed apps. Use the other options to view which files are taking up space and remove the ones you don’t want.
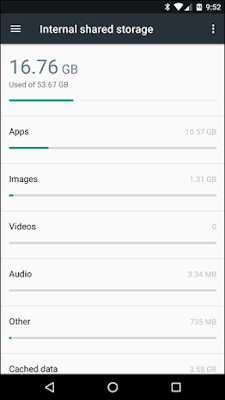
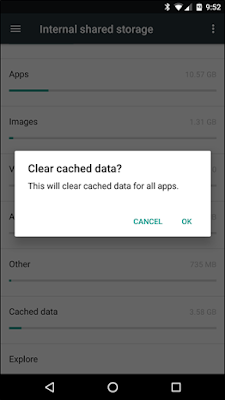
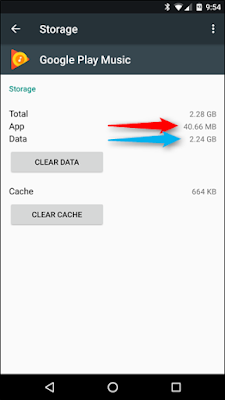
When dealing with apps, bear in mind that the app itself, its data, and its cache all add up to the total space used by the app. For example, if you have Spotify installed and you’ve cached lots of music offline, Spotify may be using over 1 GB of space. You could clear Spotify’s cache to forcibly remove this all, or launch the Spotify app and tell it to cache less data for offline listening. Any app that caches data for offline use will function like this. In the screenshot below, Google Play Music is only 40.66 MB in size on its own, but it’s storing 2.24 GB of cached music.
You can see how much space an app is using for those data files and remove the cached data for an individual app by tapping it in the Apps list, accessible by tapping Apps on the storage pane or by tapping Apps on the main Settings screen.
See Which Folders and Files Are Taking Up the Most Space with Files Go
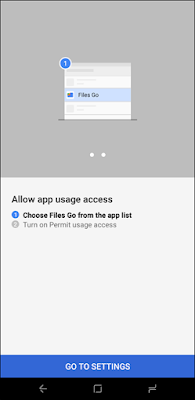
Android’s built-in tool is helpful for visualizing the space used by different types of data, but not the exact amount of space used by individual folders and files. For this, you’ll need a new app called Files Go from Google. It’s free in the Play Store, so go ahead and give it a download. You’ll need to grant storage permissions and app access when you fire it up, so run through that to jump into the main part of the app.
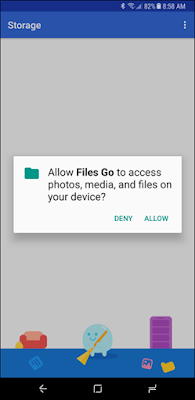
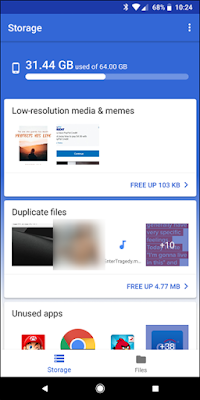
The main interface will show you some pretty interesting stuff right out of the gate: Unused apps (if you have any), low-res files, duplicate files, temporary files, downloads, and files that are taking up a lot of space. It’s super intuitive and allows you to quickly pinpoint apps and files that are literally just wasted space.
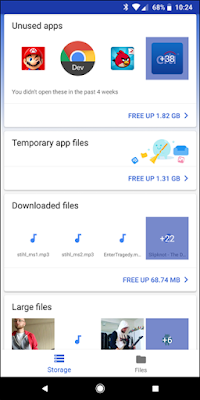
Tapping on any of the category cards will show you contents of said category, allowing you to pick and choose what you want to delete. Even the Temporary Files option lets you see which apps are holding on to data, allowing you to clear them out individually.
But wait, there’s more: tapping the “Files” option at the bottom will let you take a look at your storage in a more categorized view, very similar to Android devices running Nougat or older. This is great for anyone running Oreo who prefers the old Storage layout.
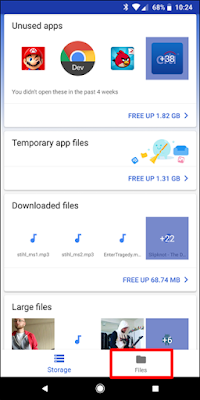
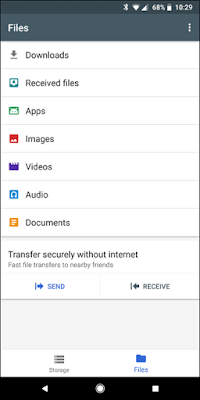
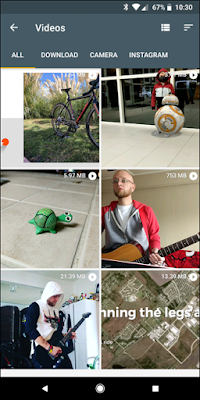
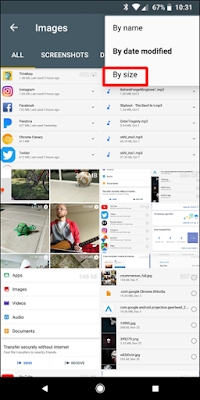
Tapping each option will show you a more granular breakdown of its contents. For example, the Images entry will show you everything from that folder, including Screenshots, Downloads, and the like. You can also choose to sort the results by name, date, and size. I recommend the latter since you’re trying to clear up space.
Add an SD Card and Move Data There
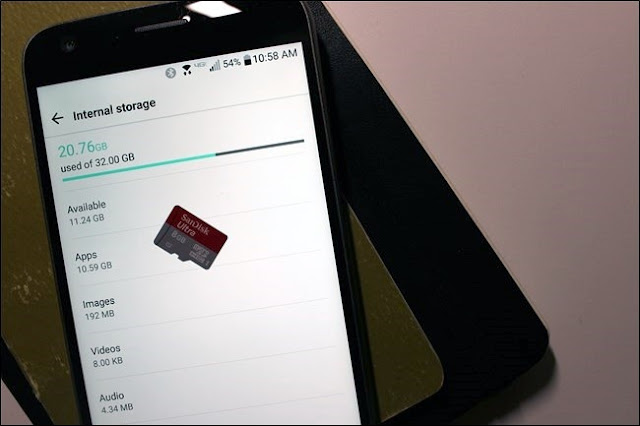
Many Android devices still ship with microSD card slots, although they are becoming less and less common. If your phone or tablet does have a microSD card slot, you can purchase a microSD card and insert it into your device to gain more storage. The storage you gain can hold music, videos, pictures, and other media files–and, in some cases, even apps (see the next section). Some apps may allow you to move their cache locations to the SD card, too.
If your device already has an SD card, this is a good option if you want more storage. MicroSD cards are fairly cheap, so you can upgrade and get a lot more storage for a fairly low price. A quick look at Amazon shows 32 GB cards for $10 and 64 GB cards for $19.
After installing the SD card, format it as portable or internal storage (if your phone has Android 6.0 Marshmallow), then connect your device to your computer and move your music, media, and other files to the SD card’s free space.
Move Apps to the SD Card
Depending on your phone and version of Android, you can also move apps to the SD card to free up space.
Users with Android Marshmallow and above can do this by formatting the SD card as internal storage. Then, the SD card will be seen as local storage on that device. The system will determine which apps make the most sense to move to the SD card, then go ahead and move them over. You can’t discern between true internal storage and an SD card formatted for internal use, so there’s now way to manually move individual apps over. (You also won’t be able to move the SD card between devices anymore, unless you erase and re-format it.)
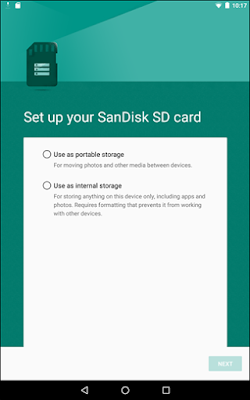
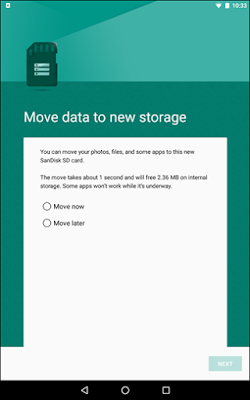
If you are running a pre-Marshmallow version of Android, you can move some apps using Android’s built-in features, or move any app by rooting your phone and partitioning your SD card. You can find instructions for both of those methods in this guide.
Move Photos to the Cloud
Photos can take up a lot of space on a modern smartphone. Rather than storing them all on your phone, you could use an app that automatically uploads photos you take to an online account like Google Photos, Dropbox, Microsoft OneDrive, Flickr, or something else. Google Photos is integrated into the “Photos” app on your Android device and offers unlimited storage of photos. You can access them from within the Photos app or at photos.google.com on any computer.
However you do this, you can then use the Photos app on your device to remove the copies of photos stored on your device itself, potentially freeing up gigabytes of space. You could also just copy those photos to your computer and back them up the old-fashioned way, too. The best part about using this method is that you can still access all of your photos through the Photos app, regardless of whether they’re stored locally or in the cloud. It’s seamless (and brilliant).
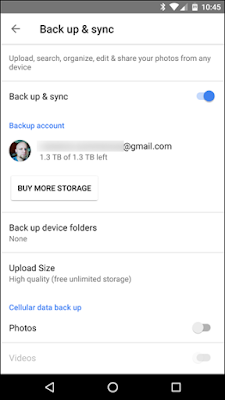
If you don’t like Google Photos, you can also do this with other apps, like Dropbox.
The same trick could work with other files taking up a lot of space on your device—for example, you could upload a large music collection to a service like Google Play Music and stream it back to your device over an Internet connection, caching the files you need instead of storing your entire collection on the phone.
At the end of the day, these tricks will only go so far–so for your next phone, make sure you have enough storage for all your files. But in a pinch, these tricks should help you get a little more space to fit the stuff that matters.
Source: How To Geek
The less space you have, the more time you’ll have to spend micromanaging the internal storage. If you find yourself regularly running out of space and needing to manage it, consider getting a phone or tablet with more storage next time around.

Use Android’s Built-in Storage Tool
Modern versions of Android have a Storage pane that will show you exactly what is taking up storage on your device. To find this, open the Settings screen and tap Storage. You can see how much space is used up by apps and their data, by pictures and videos, audio files, downloads, cached data, and miscellaneous other files. The thing is, it works a little bit differently depending on which version of Android you’re using.
Android 8.0 Oreo
Google took a fundamentally different approach with Oreo than previous versions of Android by breaking down the Storage menu into a more granular list.
Where the list was grouped together by apps and then varying types of files in Nougat and lower (which we’ll talk about down below), Oreo does things a little differently by groups and files together by category. For example, when you open the “Photos & Videos” option, it doesn’t just show you which pictures and videos are taking up space on your phone, but any associated apps, as well—like photo or video editors.


Not all apps will fall into the predefined categories, so there’s a sort of overflow for everything else, called “Other apps.” Similarly, there’s a “Files” option that lists any file that doesn’t fall into another category.

Now, all that said, there’s actually an absurdly easy way to free up space in Oreo without having to dig through every menu entry: the big “Free Up Space” button at the top. Tap it.


Doing this will basically bring up a list of Downloads on your device, as well as any photos and videos that have already been backed up (this is a simple check option, not a full list), and any “Infrequently used apps” if applicable. Choose what you want to delete, and poof—free space in the house.
If that doesn’t clear up enough for you, however, then it’s time to dig through each option manually. Pay close attention to apps and how much data they’re storing—for example, apps like Google Play Music (or other music streaming apps) can store quite a bit of data as they stream. Clear that out to save yourself a ton of space.


Android 7.0 Nougat and Below
Once you’re in the Storage menu in any version of Android below Oreo, just tap an option to see exactly what’s using up space and delete it. For example, you could tap Apps to see a list of apps using up the most space and remove them. Tap downloads to view your downloads list where you can remove files and tap cached data to clear the data of all installed apps. Use the other options to view which files are taking up space and remove the ones you don’t want.


When dealing with apps, bear in mind that the app itself, its data, and its cache all add up to the total space used by the app. For example, if you have Spotify installed and you’ve cached lots of music offline, Spotify may be using over 1 GB of space. You could clear Spotify’s cache to forcibly remove this all, or launch the Spotify app and tell it to cache less data for offline listening. Any app that caches data for offline use will function like this. In the screenshot below, Google Play Music is only 40.66 MB in size on its own, but it’s storing 2.24 GB of cached music.
You can see how much space an app is using for those data files and remove the cached data for an individual app by tapping it in the Apps list, accessible by tapping Apps on the storage pane or by tapping Apps on the main Settings screen.

See Which Folders and Files Are Taking Up the Most Space with Files Go
Android’s built-in tool is helpful for visualizing the space used by different types of data, but not the exact amount of space used by individual folders and files. For this, you’ll need a new app called Files Go from Google. It’s free in the Play Store, so go ahead and give it a download. You’ll need to grant storage permissions and app access when you fire it up, so run through that to jump into the main part of the app.


The main interface will show you some pretty interesting stuff right out of the gate: Unused apps (if you have any), low-res files, duplicate files, temporary files, downloads, and files that are taking up a lot of space. It’s super intuitive and allows you to quickly pinpoint apps and files that are literally just wasted space.


Tapping on any of the category cards will show you contents of said category, allowing you to pick and choose what you want to delete. Even the Temporary Files option lets you see which apps are holding on to data, allowing you to clear them out individually.
But wait, there’s more: tapping the “Files” option at the bottom will let you take a look at your storage in a more categorized view, very similar to Android devices running Nougat or older. This is great for anyone running Oreo who prefers the old Storage layout.


Tapping each option will show you a more granular breakdown of its contents. For example, the Images entry will show you everything from that folder, including Screenshots, Downloads, and the like. You can also choose to sort the results by name, date, and size. I recommend the latter since you’re trying to clear up space.


Add an SD Card and Move Data There

Many Android devices still ship with microSD card slots, although they are becoming less and less common. If your phone or tablet does have a microSD card slot, you can purchase a microSD card and insert it into your device to gain more storage. The storage you gain can hold music, videos, pictures, and other media files–and, in some cases, even apps (see the next section). Some apps may allow you to move their cache locations to the SD card, too.
If your device already has an SD card, this is a good option if you want more storage. MicroSD cards are fairly cheap, so you can upgrade and get a lot more storage for a fairly low price. A quick look at Amazon shows 32 GB cards for $10 and 64 GB cards for $19.
After installing the SD card, format it as portable or internal storage (if your phone has Android 6.0 Marshmallow), then connect your device to your computer and move your music, media, and other files to the SD card’s free space.
Move Apps to the SD Card
Depending on your phone and version of Android, you can also move apps to the SD card to free up space.
Users with Android Marshmallow and above can do this by formatting the SD card as internal storage. Then, the SD card will be seen as local storage on that device. The system will determine which apps make the most sense to move to the SD card, then go ahead and move them over. You can’t discern between true internal storage and an SD card formatted for internal use, so there’s now way to manually move individual apps over. (You also won’t be able to move the SD card between devices anymore, unless you erase and re-format it.)


If you are running a pre-Marshmallow version of Android, you can move some apps using Android’s built-in features, or move any app by rooting your phone and partitioning your SD card. You can find instructions for both of those methods in this guide.
Move Photos to the Cloud
Photos can take up a lot of space on a modern smartphone. Rather than storing them all on your phone, you could use an app that automatically uploads photos you take to an online account like Google Photos, Dropbox, Microsoft OneDrive, Flickr, or something else. Google Photos is integrated into the “Photos” app on your Android device and offers unlimited storage of photos. You can access them from within the Photos app or at photos.google.com on any computer.
However you do this, you can then use the Photos app on your device to remove the copies of photos stored on your device itself, potentially freeing up gigabytes of space. You could also just copy those photos to your computer and back them up the old-fashioned way, too. The best part about using this method is that you can still access all of your photos through the Photos app, regardless of whether they’re stored locally or in the cloud. It’s seamless (and brilliant).

If you don’t like Google Photos, you can also do this with other apps, like Dropbox.
The same trick could work with other files taking up a lot of space on your device—for example, you could upload a large music collection to a service like Google Play Music and stream it back to your device over an Internet connection, caching the files you need instead of storing your entire collection on the phone.
At the end of the day, these tricks will only go so far–so for your next phone, make sure you have enough storage for all your files. But in a pinch, these tricks should help you get a little more space to fit the stuff that matters.
Source: How To Geek
Five Ways to Free Up Space on Your Android Device
 Reviewed by Hamster Lucu
on
1/15/2018 10:37:00 AM
Rating:
 Reviewed by Hamster Lucu
on
1/15/2018 10:37:00 AM
Rating:


No comments: